DronaBlog

Saturday, June 6, 2020

Top 10 new features in the Informatica MDM 10.4

Are you looking for an article that will provide detailed information about the new features in Informatica MDM 10.4? Are also would like to know what are the components changed for MDM 10.4? If so, then you reached the right place. In this article, we will discuss what are the new features introduced in the Informatica MDM hub, Provisioning Tool, Customer 360, or Entity 360.

Categories

The new features in the Informatica MDM 10.4 are broadly categorized are:
1. MDM Hub features
2. Provisioning Tool features
3. E360/Customer 360 features

Here are top 10 new features in the Informatica MDM 10.4 -
1. MDM hub login screen
2. Match Rule Sets in Provisioning Tool
3. ElasticSearch customization
4. Hyperlink configuration
5. New Hierarchy views
6. Chart Components
7. Multiple Task handling
8. Find and Replace
9. Bulk Data Import
10. Ad hoc Matching


A. MDM Hub features


1. MDM hub login screen
When user access MDM hub URL https://<server name><port>/cmx, the .jar file will be downloaded instead of JNLP file. Once the user double clicks on .jar file, it will open the login page. From MDM 10.4 onwards you can provide connect URL in login pages. So do not have to download .jar for each environment.


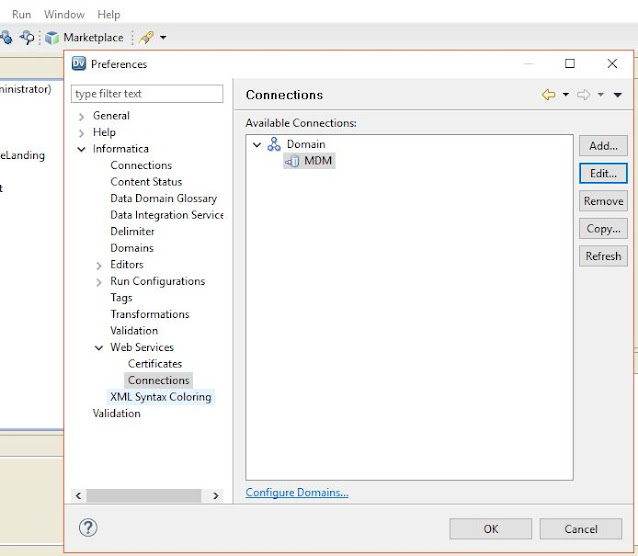
B. Provisioning Tool features


2. Match Rule Sets in Provisioning Tool
The new feature Match Rule Sets is introduced in the Provisioning Tool. Using this feature we can perform match tuning activity with help of business users.


3. ElasticSearch customization

We can customize ElasticSearch properties such as Tokenizers, Token Filters, Character filters, and Analyzer using the Provisioning Tool.


4. Hyperlink configuration

Prior to MDM 10.4, there was no provision to configure hyperlinks in Entity 360 or Customer 360 applications. With this latest upgrade, we can configure hyperlinks for Email, Web, etc fields.


C. E360/Customer 360 features


5. New Hierarchy views
With MDM 10.4, Hierarchy configuration has changed, and also the look and feel of hierarchy different than the earlier versions. 


6. Chart Components
More controls are provided in MDM 10.4 for the configuration of charts in Entity and Customer 360 applications.


7. Multiple Task handling
With newer version of Informatica MDM, you can assign, claim or edit multiple tasks in a single request


8. Find and Replace
The update operation in Entity 360 and Customer 360 application became easier. We can update multiple records in a single request using Find and Replace functionality.

9. Bulk Data Import
The bulk import functionality improved by adding artificial intelligence to it. The mapping of source and target fields automatically done by using artificial intelligence.


10. Ad hoc Matching
Using Ad hoc matching, we can match records dynamically and make a golden copy of it.


Learn more about these features in detail here -


Monday, June 1, 2020

Informatica MDM - Sample requests using Business Entity Services

In this article, we will understand various sample requests using Informatica Business Entity Services. The sample requests are prepared using PKEY_SRC_OBJECT and ROWID_OBJECT values. The server name, port, and other parameters need to be updated specifically to your project.


1: Get request using PKEY_SRC_OBJECT
https://localhost:8080/cmx/cs/orcl-CMX_ORS/Customer/SFA:PKEY_000001?systemName=SFA&depth=5&suppressLinks=true

2: Get request using 'query' parameter
https://localhost:8080/cmx/cs/orcl-CMX_ORS/Customer?systemName=SFA&depth=2&suppressLinks=true&action=query&filter=CustomerAdditionalInformation.xslpTaskId={{SFATaskNumber}}


3: Create a new customer
Endpoint: https://localhost:8080/cmx/cs/orcl-CMX_ORS/Customer?systemName=SFA&depth=2&suppressLinks=true

Request Body:

{
"key":{ "sourceKey": "PKEY_00000021" },
"fullNm": "Sample Customer 123",
"fstNm": "KC First Name",
"lstNm": "KC Last Name",
"partyType":"",

"CustomerAltIdSMPLCustId":
  { "item": [
   {
"key":{ "sourceKey": "PKEY_0000002~SMPLID" },
"SMPLCustId":"123"
   }
   ]
},

"CustomerAltIdSMPLCustUniqId":
  { "item": [
   {
"key":{ "sourceKey": "PKEY_0000002~SMPLUniqId" },
"SMPLCustUniqId":"123"
   }
   ]
},

"CustomerAltIdContractId":
  { "item": [
   {
"key":{ "sourceKey": "PKEY_0000002~CNTRID" },
"ContractId":"123"
   }
   ]
},

"PartyAddress":
{ "item": [
   {
"key":{ "sourceKey": "PKEY_0000002-SHIP" },
"xaddrtyp":"Shipping",
"xaddrln1": "123 ST",
"xaddrln2": "",
"xcity": "New York",
"xcntrycd": "US",
"xstprvnc": "NY",
"xpstlcd": "10101"
   }
  ]
  },
 
"CustomerAlternateNames":
{ "item": [
{ "key":{ "sourceKey": "PKEY_0000002~FORMAL" },
"altNm":"FORMAL_1234",
"xprtyAltNameType":"Does Business As (FORMAL)"
}
]
},

"CustomerPhone":
{ "item": [
{ "key":{ "sourceKey": "PKEY_0000002~PHONE" },
"phnNum":"123456890",
"phnTypeCd":"Telephone"
}
]
},


"CustomerPartyParentRel":
{ "item": [
{ "key":{ "sourceKey": "PKEY_000001~PKEY_0000002" },

"CustomerPartyParent" : {
"key":{ "sourceKey": "PKEY_000001" }
}
}
]
}
}


4. Update customer using rowid_object
Endpoint: https://localhost:8080/cmx/cs/orcl-CMX_ORS/Customer/rowId?systemName=SFA&suppressLinks=true&depth=2

Request Body:

{
    "rowidObject":{{SFDCMDMID}},
    "fullNm": "Integration Update Test 890",
    "fstNm": "Samle first Name 890",
    "lstNm": "Samle last Name 890",
    "AccntStsCode": {
        "accntstscd": "CUST"
    },
    "$original": {
        "fullNm": "fullNm",
        "fstNm": "fstNm",
        "lstNm": "lstNm",
        "AccntStsCode": {
            "accntstscd": "CUST"
        }
    },
    "CustomerAltIdTaxId": {
"$original":{"item":[null]},
        "item": [
            {
                "key": {
                    "sourceKey": "PKEY_0000003~TAXID"
                },
                "taxId": "tax01"
            }
        ]
    },
    "CustomerAltIdABC_CORPOfficeNumber": {
    "$original":{"item":[null]},
        "item": [
            {
                "key": {
                    "sourceKey": "PKEY_0000003~ABC_CORPRTLSNUM"
                },
                "ABC_CORPOfficeNum": "ABC_CORPOffice01",
                "xaltIdType": "ABC_CORP  Office Number"
            }
        ]
    },
   
    "CustomerAltIdGovLicNum": {
    "$original":{"item":[null]},
        "item": [
            {
                "key": {
                    "sourceKey": "PKEY_0000003~GOVLICID"
                },
                "GovLicNum": "tc001",
                "xaltIdType": "Gov License Number"
            }
        ]
    },

    "CustomerPartyParentRel": {
    "$original":{"item":[null]},
        "item": [
            {
                "key": {
                    "sourceKey": "PKEY_0000003~HeadQuarter"
                },
               "xprtyPrnt":8
            }
        ]
    }
}


5: Update customer using PKEY_SRC_OBJECT
Endpoint URL: https://localhost:8080/cmx/cs/orcl-CMX_ORS/Customer?systemName=SFA&suppressLinks=true&depth=2

Request Body:

{
    "key": {
        "sourceKey": "PKEY_0000003"
    },
    "fullNm": "Integration Update Test 6",
    "fstNm": "Samle first Name 6",
    "lstNm": "Samle last Name 6",
    "xhastbcclcnsflg": "1",
    "xnsleffctvdt": "2015-08-19T00:05:31.630+05:30",
    "xnslpblshddt": "2015-08-19T00:05:31.630+05:30",
    "AccntStsCode": {
        "accntstscd": "CUST"
    },
    "$original": {
        "fullNm": "fullNm",
        "fstNm": "fstNm",
        "lstNm": "lstNm",
        "AccntStsCode": {
            "accntstscd": "CUST"
        }
    },
    "CustomerAltIdTaxId": {
        "item": [
            {
                "key": {
                    "sourceKey": "PKEY_0000003~TAXID"
                },
                "taxId": "tax01"
            }
        ]
    },
    "CustomerAltIdABC_CORPOfficeNumber": {
        "item": [
            {
                "key": {
                    "sourceKey": "PKEY_0000003~ABC_CORPRTLSNUM"
                },
                "ABC_CORPRtlSoreNum": "ABC_CORPOffice01"
            }
        ]
    },
    "CustomerAltIdGovLicNum": {
        "item": [
            {
                "key": {
                    "sourceKey": "PKEY_0000003~GOVLICID"
                },
                "GovLicNum": "tc001"
            }
        ]
    },

    "CustomerPartyParentRel": {
        "item": [
            {
                "key": {
                    "sourceKey": "PKEY_0000003~HeadQuarter"
                },
                "CustomerPartyParent": {
                    "key": {
                        "sourceKey": "PKEY_0000005"
                    }
                }
            }
        ]
    }
}


Saturday, May 30, 2020

How to call Informatica MDM batch jobs using Informatia Data Quality (IDQ)


Are you looking for an article about calling Informatica MDM batch jobs? Are you also looking for how to call Informatica jobs using IDQ mapping or maplet? If so, then you reached the right place. In this article, we will see how to call Informatica MDM jobs such as stage, load, tokenization, match, merge, and batch groups using Informatica Data Quality (IDQ) mapping.


A. Introduction

Informatica MDM exposes various operations in the form of APIs and SOAP Web Service. We can call SOAP Web Service in Informatica Data Quality (IDQ) to execute MDM batch jobs. In this article, we will see step by step process how to create Web Service consumer and create mapping or maplet to call the SOAP Web Service.

B. Create Web Service Consumer

We need to create a web service consumer to call MDM SOAP Web Service. To create  Web Service Consumer, select Physical Data Object and right-click to add Web Service consumer. A new dialog window will open to select the component. Select it and click next.


Configure Web Service endpoint URL which can be provided by MDM team. You need username and password to access MDM SOAP Web Service.


C. Create MDM Connection

To create MDM connection, go to Windows -> Preferences and select Connections under Web Services component. Provide authentical details as shown in the screen below.


Make sure proper values for Timeout, HTTP Authentication Type, and WS-Security Type are selected. Then test the Web Service connection using 'Test Connection' button.


D. Mapping Overview

The mapping contains source component, input expression, Web Service Consumer transformation, output expression, and target component. 


1.  Source Component

Create a source component as flat file or database table.


2.  Input expression


Create an input expression and translate input values into Web Service-specific values such as orsId, batchGroupUid etc.


3.  Web Service Consumer Transformation 

Create a web service consumer transformation and pass the input variables.


Verify all the required ports properly automatically populated.


Update the input mapping with proper ports and if any ports are improperly mapped then correct it. Make sure key columns in the target are all mapped with some values from input


Verify the output mapping is correctly populated. Make necessary changes if required.


Make sure the Connection object is properly populated and other relevant properties under the Advanced section.


4.  Union Transformation 

Combine all the output parameters from web service and create a Union transformation. This is required to populate fault message in the response.


5.  Output Expression 

Create output expression to map all the attributes from Union transformation and translate it into the output format.


6.  Target Component 

Create the target component with a flat file or database table to persist the response of Informatica MDM job status and statistics.


Saturday, April 11, 2020

Informatica Data Quality - IDQ - How to call Web Service in Java Transformation


In this article, we are going to understand step by step process to create Informatica Data Quality (IDQ) mapping to make external Web Service calls using Java transformation.


A. Overview of mapping

The mapping contains 5 major components. The first component is the source file. We can use a file or a database table as input this mapping which can hold basic information. The second component is an expression to convert input values to make them suitable for Java transformation. The third component is Java transformation which contains logic to make a call the web service. The next component is an output expression to transform the response from Java expression into output format. The last component is a target file or a database table to populate response.


B. Source Component

The source in the mapping can be a flat file or database table. It will contain the input required for Web Service. e.g. Web Service URL, Username, Password, Context etc.

Source File


C. Source Expression

The source expression will be used to convert input values into suitable Java transformation input. e.g. Join multiple sources attributes to create URL, prepare the web service endpoint URL, populate username and password, or any other custom processing etc.


D. Java Transformation

The Java transformation can be used to call external or internal Web Service. In this example, we are going to call external web service.

a) Import jar file

Import all the required files and store at local system or Unix box. The IDQ mapping should read access to these files so that those can be loaded in JVM. Once all the required jars are stored, set the classpath variable under the Advanced section and point it to each of the jar files.


b) Import classes

Import all the java classes which are required to call web service. Here is screenshot with sample java classes used during the Web Service call.


c)  Call Web Service

Once we have all the required information to call Web Service, write a logic to handle the business requirement. In the java logic below, we are calling web service two times. From the first web service call, we are getting the response and sending that response in second web service call and then we are getting the final output.


The sample code is here,

/**
* Author : Abc
* This Java code is used to get status of the the input task and wait until it become 'SUCCESS'

* Input Parameters:
* taskName - Input taskflow
* urlSubmit - Web service endpoint to get RunId for input taskflow
* urlGetStatus - Web service endpoint to get status using RunId
* loginUid - Userid for authentication
* loginPwd - Password for authentication
*/

       try {
       
        // Step 1: Get RunId using Web Service endpoint and task name
String url = "https://localhost:8080/TaskName";
// String url = urlSubmit + taskName;
        String name = "abcuser";
       // String name = loginUid;
       String password = "abcpassword;
       // String password = loginPwd;
        String authString = name + ":" + password;
        String authStringEnc = Base64.getEncoder().encodeToString(authString.getBytes());
        Client restClient = Client.create();
        WebResource webResource = restClient.resource(url);
        ClientResponse resp = webResource.accept("application/json").header("Authorization", "Basic " + authStringEnc).get(ClientResponse.class);       
        String stTaskIdMessage = resp.getEntity(String.class);
      
        // Step 2: Parse response to get RunId from Web Service for given task
        JSONParser jsonParser = new JSONParser();
        JSONObject jsonObj = (JSONObject) jsonParser.parse(stTaskIdMessage);
        String stRunId = (String) jsonObj.get("RunId");
        
        // Step 3: Call Web service endpoint to get status of input taskflow and check if it not in 'RUNNING' state. 
        // If it is in RUNNING stage, wait until the state changes.
        boolean isRunning = true;
        String stStatus = "";
        while (isRunning) {
          String url2 = "https://localhost:8080/task/status/"+stRunId;
             WebResource webResourceStatus = restClient.resource(url2);
             ClientResponse respStatus = webResourceStatus.accept("application/json").header("Authorization", "Basic " + authStringEnc).get(ClientResponse.class);
             String stStatusMessage = respStatus.getEntity(String.class);
             
             JSONObject jsonStatusObj = (JSONObject) jsonParser.parse(stStatusMessage);
             stStatus = (String) jsonStatusObj.get("status");
             if (!stStatus.contentEquals("RUNNING") ) {
              isRunning = false;
      } else {
      Thread.sleep(10000); // Value is in millisecond. Currently it is set for 10 seconds
      }

        runId = stRunId;
status = stStatus; // Return status to output field.
       }
catch (Exception e)  { // Required to handle exception which is thrown from JSON Parser.
e.printStackTrace();
}


d)  Call Web Service

The full source code can be accessed from Java -> Full code. This will give broader view of how the Java code executed at run time.


e) Compile code

Once the code completed then compile to code in order to generate .class files load in the memory. In order to compile the code user section - Advanced -> Properties -> Compilation


E. Output Expression

Create output expression to translate the output from Java transformation into the output file or database table.


F. Output Component

Create output file or database table in order to populate the final response output. The output can be used for business use purposes.


Wednesday, April 1, 2020

Top 5 indicators in the Informatica MDM

Are you looking for details about what are the different types of indicators used in the Informatica Master Data Management (MDM) system? Are you also interested in knowing what are the valid values for these indicators and what those values mean? If so, then you reached the right place. In this article, we will understand different indicators such as HUB_STATE_IND, CONSOLIDATION_IND, etc and their values in detail.

Indicators in the Informatica MDM:
Informatica MDM maintains several types of indicators and those are used during internal MDM processing. The indicators maintained in the MDM system are

1. HUB_STATE_IND
2. CONSOLIDATION_IND
3. DIRTY_IND
4. DELETED_IND
5. AUTOMERGE_IND


A)  HUB_STAE_IND indicator
This field present in BO, XREF tables. These indicator fields represent whether the record is in the active, deleted or pending state.
   
Value
Meaning
1
Active Record
0
Pending Record
-1
Inactive Record


B)   CONSOLIDATION_IND indicator

This filed present in the BO table. This indicator field represents whether the record is gone through the match process or not.

Value
Meaning
4
The new record (Unmerged record)
3
The record has gone through the match process and ready for consolidation
2
Queued for the Merge process
1
Consolidated or Golden record
9
The record is on hold. Normally data steward keep records on hold


C)  DIRTY_IND indicator

This field present in the BO table but it is no more in used. It was used for the tokenization process in the earlier release. But now instead of this field, <BO>_DRTY table is used for the tokenization process. Valid values are 1 and 0 for this field. 0 means record is ready for tokenization and 1 means record went through tokenization process.


D)   DELETED_IND indicator

This field present in BO and XREF Tables. It is reserved for future purposes.


E)   AUTOMERGE_IND indicator

This field present in MTCH and HMRG tables. The valid values are 0 and 1.

Value
Meaning
1
Records are queued for auto-merge
0
Records are queued for manual merge


What is CRM system?

  In the digital age, where customer-centricity reigns supreme, businesses are increasingly turning to advanced technologies to manage and n...