Step 1: Download weblogic server installer from Oracle website. If you downloaded on the Windows system then it will be .exe file. The first thing we need to create Weblogic server installation is the 'Domain. Double click on .exe file to launch it. You will get below dialog window where you need to provide domain name and location of domain. Provide these details and click on 'Next' button.
 |
Step 2: We need to create administrator user to perform administrator activities on weblogic server. To create admin user provide user name and password and optional description in the dialog window as shown in below screen shot and click on 'Next' button.

Step 3: Based on environment we need to choose Development Mode or Production Mode. Choose option appropriately. You can either select available JDK or Other JDK which is installed in your system. I would recommend to use the 'Other JDK' option as it will be for maintainability perspective. After selecting JDK option click on 'Next' button.

Step 4: Select all the components which are required for your environment. Based on these selections the next screen will change. In our current selection we are choosing 'Administration Server', 'Managed Servers, Clusters and Machines' and 'Deployments and Services' options. If you need JMS configuration also then choose option accordingly and then click the 'Next' button.

Step 5: In the next dialog box we need to provide the details about Administration Server, such as Administration Server Name, Listen port, SSL port etc. Once all these details are provided then click on the 'Next' button.

Step 6: After providing admin server details, next screen will ask us to provide managed server details. Provide the managed server name, hosting server, listening port and SSL port if SSL is enabled. Once all these details are provided then click on 'Next' button.

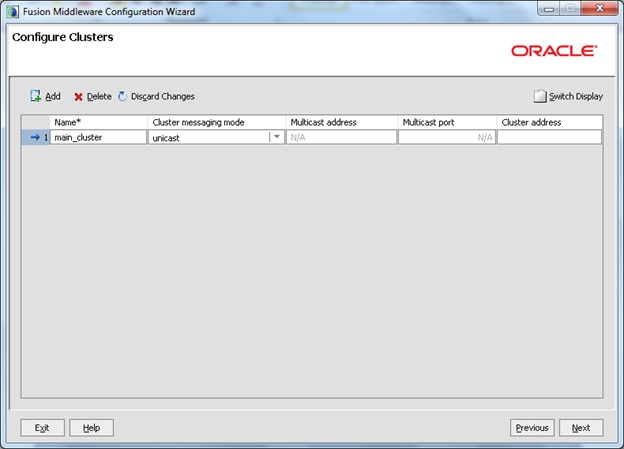
Step 7: In this step we need to configure cluster if your project requires cluster to be configured for better application availability and performance. Click the 'Next' button on this screen.


Step 10: In this step assign Admin Server and Manged servers to machine. Once assignment is done click on the 'Next' button.

Step 11: Assign JMS Services, Work manager and any other services to clusters or servers which are configured in earlier steps. Click on the 'Next' button.


With these steps, Weblogic server is ready for use. You can refer the video below to learn more about Weblogic server.