Are you looking for an article about how to install weblogic server? If so, then refer this article as it provides detailed step by step instructions about how to install weblogic server. In this article, we are going to see steps for installing weblogic server with version 10.3.6.
Step 1: Download weblogic server installer from Oracle website. If you downloaded on the Windows system then it will be .exe file. The first thing we need to create Weblogic server installation is the 'Domain. Double click on .exe file to launch it. You will get below dialog window where you need to provide domain name and location of domain. Provide these details and click on 'Next' button.
Step 2: We need to create administrator user to perform administrator activities on weblogic server. To create admin user provide user name and password and optional description in the dialog window as shown in below screen shot and click on 'Next' button.
Step 3: Based on environment we need to choose Development Mode or Production Mode. Choose option appropriately. You can either select available JDK or Other JDK which is installed in your system. I would recommend to use the 'Other JDK' option as it will be for maintainability perspective. After selecting JDK option click on 'Next' button.
Step 4: Select all the components which are required for your environment. Based on these selections the next screen will change. In our current selection we are choosing 'Administration Server', 'Managed Servers, Clusters and Machines' and 'Deployments and Services' options. If you need JMS configuration also then choose option accordingly and then click the 'Next' button.
Step 5: In the next dialog box we need to provide the details about Administration Server, such as Administration Server Name, Listen port, SSL port etc. Once all these details are provided then click on the 'Next' button.
Step 6: After providing admin server details, next screen will ask us to provide managed server details. Provide the managed server name, hosting server, listening port and SSL port if SSL is enabled. Once all these details are provided then click on 'Next' button.
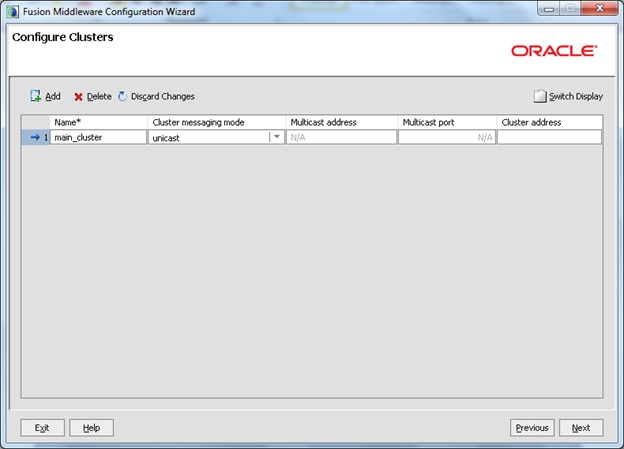
Step 7: In this step we need to configure cluster if your project requires cluster to be configured for better application availability and performance. Click the 'Next' button on this screen.
Step 8: In the next step assign servers to clusters. Once servers are assigned to cluster click on the 'Next' button.
Step 9: We need to create machine on which servers will be running. So configure machine name and listen address and listen port. Once these details are provided click on the 'Next' button.
Step 10: In this step assign Admin Server and Manged servers to machine. Once assignment is done click on the 'Next' button.
Step 11: Assign JMS Services, Work manager and any other services to clusters or servers which are configured in earlier steps. Click on the 'Next' button.
Step 12: We will see summary of Weblogic server configuration in the next screen. Click on the 'Create' button.
Step 13: In this screen, we can see progress of Weblogic server installation and components which are getting installed. Once 100% installation is done then click on the 'Done' button.
With these steps, Weblogic server is ready for use. You can refer the video below to learn more about Weblogic server.
Are you planning to install Informatica MDM in the Windows system? Are you looking for step by step instructions about the installation of Informatica MDM? If so, then you can refer to this article to understand the steps involved during the MDM installation.
Step 1: Locate the installer file, received from the Informatica Support team. In the Windows system, it will be .exe file. Double click on the .exe file. The dialog window will appear as shown in the screen below. Read the agreement and select the radio button corresponding to 'I accept the terms of the License Agreement' and then click on the 'Next' button.
Step 2: Select the file system location on the Windows System where you would like to install the Informatica MDM product. You can browse the location using the 'Choose' button. After providing the location click on the 'Next' button.
Step 3: If you would like to create a short cut for the MDM Hub on the Desktop or in the Start Menu then choose the shortcut folder location. Click on the 'Next' button after choosing the shortcut folder option.
Step 4: When you buy the Informatica product from Informatica, it comes with the license file. You can browse the license file using 'Choose' button and then click on the 'Next' button.
Step 5: The next step is important. If you are using the Weblogic application server then select the radio button corresponding to the 'Weblogic' option or else select the other based on the application server you are using in your environment. After it, click on the 'Next' button.
Step 6: The next step will ask to provide the application server home location. You can provide the path or browse the application server home location by using 'Choose' button. After providing the home path, click on the 'Next' button.
Step 7: If you are using the Weblogic application server then the dialog window mentioned below will appear to provide the Weblogic application server details. You need to provide the host name (it is the server name on which the weblogic server is installed), Server name, Weblogic user name, Weblogic user password and listen port on which the weblogic server is listening. You can get the information from your middleware (application server installation) team. In the screen shot below, the sample values are provided. After providing the server details, click on the 'Next' button.
Step 8: After providing the details about the application server, the next step is to provide the database details. If you are using the Oracle database then select the radio button corresponding to 'Oracle 11g R2' or the respective database version (If you are using a higher version of MDM then the database version option will be different). Click on the 'Next' button.
Step 9: Based on the database setup, if you can select the database Service Name or the database SID (Oracle System Id). You can get the Service Name or the SID name from your DBA. Click on the 'Next' button.
Step 10: If you are using the Oracle database then the dialog window mentioned below will appear to provide the Oracle database details. You need to provide the Server (it is the name of the server on which the Oracle database is installed), Port on which the database is listening, Service name, System Schema name and System Schema password. You can get the information from your DBA team. In the screen shot below, the sample values are provided. After providing the database details, click on the 'Next' button.
Step 11: The next dialog window will show connect url. You can verify connect url. If you would like to make any changes in connect url then select the radio button corresponding to 'Yes' or else select the radio button corresponding to 'No' option. After selecting the appropriate option click on the 'Next' button.
Step 12: After the installation of the MDM product we need to run the post install script. It can be done in two ways: We can run the post install script
1) immediately after running the installation file or
2) manually after the installation is done.
If you would like to run the post install script immediately after the installation is done then select the radio button corresponding to the 'Yes' option. After the appropriate option selection click on the 'Next' button.
Step 13: After providing all necessary information, the pre-installation summary will be provided as shown in the screen shot below. It shows the Product Name, the Install Folder, the Shortcut location, the Application server details and the database details.
Step 14: The pre-installation summary also provides more information as shown in the screen shot below. It shows the required disk space as well as the available disk space. If everything looks good then click on the 'Install' button.
Step 15: The installation will start and the progress bar will show the progress of installation. The screen shot below provides the details about progress with the steps of execution.
Step 16: Finally, the installation will be completed and the successful message will appear on the screen.
With the help of these steps, you will be able to install the MDM software successfully. Refer to the video below to learn the Informatica MDM product.
Are you preparing for Java interview and looking for information for preparation? Are you also interested in knowing what kinds of questions about Object Oriented concepts are normally asked during Java interview? If so, then this article provides detailed questions and answers about Java, Object Oriented Concepts. This article also provides detailed information about Inheritance concepts. Good luck for your interview.
Q1: What is Object Oriented Programming? Answer:
A programming style which is associated with the concepts like an object, a class, the inheritance, the polymorphism, an encapsulation and an abstraction is called as Object Oriented Programming.
Q2: What are the core concepts of Object Oriented Programming? Answer:
The core concepts of Object Oriented Programming are:
Inheritance
Encapsulation
Abstraction
Polymorphism
Q3: What is inheritance? Answer:
Inheritance is nothing but inheriting properties (behaviour and state) of class into other class.
The process by which one object acquires characteristics from one or more other objects is also termed as inheritance. e.g. children acquire characteristics from their parents.
The class from which properties are inherited is called parent class or base class or superclass.
The class in which properties are inherited is called child or derived class or subclass.
It helps to reuse the code and establish a relationship between different classes.
The common business logic can be moved from the derived class into the base class to improve maintainability of code.
Q4: What are types of inheritances? Answer:
There are 4 types of inheritance
1. Single Level Inheritance
2. Multi Level Inheritance
3. Hierarchical Inheritance
4. Hybrid Inheritance
Q5: Explain types of inheritances? Answer:
1. Single Level Inheritance:
a. In this type of inheritance, one class inherits the properties of the another class.
b. Properties such as behaviour and state from a single parent class is inherited in child class.
b. It helps to add new feature in existing code as as the code re-usability.
Here, Class Shape is parent class and Class Triangle is child class which inherits the properties and behaviour of the parent class.4
Class Shape { ... } Class Triangle extends Shape { ... }
2. Multilevel Inheritance:
a. If class has more than one parent then it is called Multilevel Inheritance.
b. In the multilevel inheritance, a class is derived from the parent class which is also derived from another parent class.
Here, The class Square is derived from it's parent class Rectangle which is derived from it's parent Shape. The class Square has two parents - Rectangle and Shape respectively. Hence it is a multilevel inheritance.
Class Shape { ... } Class Rectangle extends Shape { ... } Class Square extends Rectangle { ... }
3. Hierarchical Inheritance:
a. In the hierarchical inheritance the parent class has more than one child classes.
b. We can also state that if more than one child classes have the same parent class then it is a hierarchical inheritance.
Here, the super class Shape has two sub classes - Triangle and Rectangle, hence it is a hierarchical inheritance.
Class Shape { ... } Class Triangle extends Shape { ... } Class Rectangle extends Shape { ... }
4. Hybrid Inheritance:
a. It is a combination of multiple inheritance and multilevel inheritance.
b. The multiple inheritance is not supported in Java as it leads to ambiguity.
c. Java supports multiple interfaces inheritance.
Q6: What is Implementation inheritance? Answer:
a. Implementation inheritance is also know as class inheritance.
b. We can extend an functionality by reusing functionality in the super class by inheriting all or some of the operations already implemented.
c. In Java, we can only inherit from one superclass.
d. It helps in code reusability.
e. Improper use of class inheritance can cause problem in making future changes.
f. The subclass becomes tightly coupled with the superclass.
g. We have to make sure that the subclasses depend only on the behavior of the superclass, not on the actual implementation.
Q7: What is Interface inheritance? Answer:
a. Interface inheritance is also know as type inheritance or as subtyping.
b. Interface inheritance reduces the coupling or implementation dependencies between systems.
c. It promotes the design concept of program to interfaces not to implementations.
d. We can implement any number of interfaces.
e. As this type of implementation will not influence specific subclass implementations, hence it is more flexible than implementation inheritance.
Q1. What does the HM console allow Data stewards to do?
A. Perform matching and merging of relationship data.
B. Display detailed graphic views of entities and relationships.
C. Configure data models in the hub store.
D. Run batch load jobs of hierarchy data.
Q2. What does the match tables contain?
A. All records with consolidation indicator set to 1
B. All records in a match batch
C. Match pair information
D. All match rules
Q3. Before security settings have been applied, it is recommended that initial IDD config with admin level security has been set.
A. True
B. False
Q4. What statement best decribes the key width?
A. It can be any user-defined value
B. It is always 10 characters
C. The choices include standard, limited, extended and preferred.
D. It determines the match score.
Q5. Which one of the following is NOT an MDM product?
A. Master Referenece Server
B. HM
C. SAM
D. Informatica Data services
Previous QuizNext Quiz
Are you looking for various commands in the Unix environment? Are you also looking for what are structures and samples for each command in the Unix system? If so, then this article provides detailed information about command details with its usage. In this article we will focus on the 'tar' command.
'tar' command:
What is the 'tar' command and why is it used? In Unix, 'tar' is the abbreviation for Tape ARchive. This command is used to store entire file systems onto the magnetic tape. The command 'tar' is also commonly used to combine the multiple files into a single file for easy storage and distribution. Below are commonly used 'tar' commands -
A.Commands dealing with .tar files
1. The command 'tar cvf' is used to create a new tar archive file. With the 'tar' command, the files are not compressed. The files are only combined and grouped into a single archive file. $ tar cvf archive_abc.tar dirabc/ Here, c - Create a new archive v – Verbosely list files f – Following is the archive file name 2. The command 'tar xvf' is used to extract an existing archive file. $ tar xvf archive_abc.tar Here, x – Extract files from the archive file 3. The command 'tar xvf' is used to extract a single file 'file_abc' from the existing archive file. $ tar xvf archive_abc.tar /location/to/file_abc 4. The command 'tar xvf' is used to extract a single directory 'abcdir' from the existing archive file. The subdirectories and files are extracted with this command. $ tar xvf archive_abc.tar /location/to/abcdir/ To extract multiple directories use the command below $ tar xvf archive_abc.tar /location/to/abcdir1/ /location/to/abcdir1/ 5. The command 'tar xvf' is used to extract multiple files from the .tar file. We can use Regular Expression to achieve it. The command below will list all files with extension 'txt' $ tar xvf archive_abc.tar --wildcards '*.txt' 6. The command 'tar tvf' is used to view the archive file. This will list the files without extracting files. $ tar tvf archive_abc.tar 7. The command 'tar rvf' is used to add a new file in an existing .tar file. With the command below we can add 'file_pqr' file to archive_abc.tar file. $ tar rvf archive_abc.tar file_pqr We can use the command below to add the directory to the existing archive (.tar) file $ tar rvf archive_abc.tar dir_xyz/ Note: We cannot add files or directories to compressed files such as .gz or .bz2 file. If we try to add then we will get the 'Cannot update compressed archives' error message. 8. The command 'tar tvfW' is used to verify the archive (.tar) files. Normally we use this command before removing any file from the archive file. $ tar tvfW file_xyz.tar Note: a. If an output line starts with Verify with no differs line then the file/directory is Ok. If that is not the case, then we need to fix the issue. b. We cannot verify files in a compressed the archive file. (e.g. .gz, .bz2) 9. The command 'tar -cf' is used to determine the size of the .tar file. The size returned is in KB. $ tar -cf - /location/to/archive/ | wc -c 20660
B.Commands dealing with .gz files
1. The command 'tar cvzf' is used create the gzipped archive file. With the help of this command the files are compressed and grouped into a single file. The file extension .tar.gz and .tgz are both the same. $ tar cvzf archive_abc.tar.gz dirabc/ Here, z - Archive through gzip 2. The command 'tar xvfz' is used to extract the existing gzipped file. $ tar xvfz archive_abc.tar.gz 3. The command 'tar xvfz' is used to extract a single file 'file_abc' from the existing gzipped file. $ tar xvfz archive_abc.tar.gz /location/to/file_abc 4. The command 'tar xvfz' is used to extract a single directory 'abcdir' from the existing gzipped file. The subdirectories and files are extracted with this command. $ tar xvfz archive_abc.tar.gz /location/to/abcdir/ To extract multiple directories use the command below $ tar xvfz archive_abc.tar.gz /location/to/abcdir1/ /location/to/abcdir1/ 5. The command 'tar xvfz' is used to extract multiple files from the .gz file. The command below will list all files with the extension 'txt' with the help of RegExp. $ tar xvfz archive_abc.tar.gz --wildcards '*.txt' 6. The command 'tar tvfz' is used to view the .gz archive file. This will list the files without extracting files. $ tar tvfz archive_abc.tar.gz 7. The command 'tar -czf' is used to determine the size of .gz file. The size returned is in KB. $ tar -czf - /location/to/archive/ | wc -c 200
C.Commands dealing with .bz2 files
1. The command 'tar cvfj' is used to create a bzipped tar archive file. The size of bzip2 is lesser than gzip. Normally the creation of the bzip2 file takes more time to compress and decompress than gzip. $ tar cvfj archive_abc.tar.bz2 dirabc/ Here, j – Filter the archive through bzip2 Bz2 - It is the abbreviation for Burrows-Wheeler compression 2. The command 'tar xvfj' is used to extract the existing bzipped file. $ tar xvfj archive_abc.tar.bz2 3. The command 'tar xvfj' is used to extract a single file 'file_abc' from the existing bzipped file. $ tar xvfj archive_abc.tar.bz2 /location/to/file_abc 4. The command 'tar xvfj' is used to extract a single directory 'abcdir' from the existing bzipped file. The subdirectories and files are extracted with this command. $ tar xvfj archive_abc.tar.bz2 /location/to/abcdir/ To extract multiple directories use the command below $ tar xvfj archive_abc.tar.bz2 /location/to/abcdir1/ /location/to/abcdir1/ 5. The command 'tar xvfj' is used to extract multiple files from .bz2 file. The command below will list all files with the extension 'txt' with the help of RegExp. $ tar xvfj archive_abc.tar.bz2 --wildcards '*.txt' 6. The command 'tar tvfj' is used to view the .bz2 archive file. This will list the files without extracting files. $ tar tvfj archive_abc.tar.bz2 7. The command 'tar -cjf' is used to determine the size of .bz2 file. The size returned is in KB. $ tar -cjf - /location/to/archive/ | wc -c 200 The video below provides details about commands in the Unix environment:
A. It stores the rules for processing and managing the master data.
B. It comes pre-configured with the MDM hub.
C. It stores user login info for the MDM hub.
D. All the choices are correct.
Q2. Which choice best describes what influences tokenization?
A. Key width.
B. STRIP_ CTAS_DELETE_ RATIO.
C. Fuzzy match column.
D. All the choices influence tokenization.
Q3. Part of child relationship refers to a child record on a many-many relationship that really belongs to one record in primary object
A. True
B. False
Q4. Which statements are correct regarding IDD
A. All interaction between an IDD application and an ORS is through SIF API calls
B. Searching for data in an subject area can be based only on searchMatch SIF API.
C. IDD uses clenasePUT API
D. By default, IDD authenticates users with a SIF call to the hub server.
Q5. Which statements are true regarding trust configuration?
A. All columns in a base object must have trust enabled
B. You can configure trust with no decay
C. You can change trust setting after records have been loaded into base object.
D. Validation rules can downgrade the trust below the minimum trust value
Previous QuizNext Quiz
Are you looking for information about what variables are available in the Unix Operating system? Would you be interested in knowing how to work with variables in the Unix environment? This article provides details about variables used in Unix programming with sample examples.
Introduction
A variable in the Unix environment is used to store values temporarily and use it during program execution.
A variable can contain only letters (a to z or A to Z), numbers ( 0 to 9) or the underscore character ( _). The standard practice is to use the variable name in UPPERCASE but it is not mandatory. We can write it in lowercase too.
For example: testVar, test1, var1 , 2var, _var
What are types of variables?
Local Variables: These variables present within the current instance of the shell. These are not available to programs that are started by the shell. They are set at the command prompt.
Environment Variables: These variables are available to any child process of the shell.
Shell Variables : A shell variable is a special variable that is set by the shell and is required by the shell in order to function correctly. These can include environment variables and local variables.
Defining and Initiating Variables
The syntax for creating a variable is as below
variable_name = variable_value
Here variable 'country' is a scalar variable. A scalar variable can hold only one value at a time.
e.g. country=“India”
Unix shell enables us to store any value - like storing the integer value in the country_cd field
e.g. country_cd=100
How to access value from a variable?
To access value from a variable, we need to use the $ character before the variable name.
For example,
#!/bin/sh
NAME="Techno Guru"
echo $NAME
How to create the read only variable?
To mark variables as read only by using the readonly command.
The value of the readonly variable cannot be changed.
e.g.
#!/bin/sh
VAR="Techno Guru"
readonly VAR
VAR="Training"
How to unset variables?
Unsetting or deleting a variable directs the shell to remove the variable from the list of variables that it tracks.
Once we unset a variable, we cannot access the stored value in the variable.
We cannot use the unset command to unset variables that are marked readonly
e.g.
#!/bin/sh
VAR="Techno Guru"
unset VAR
echo $VAR
The video below provides in-depth knowledge about how to use variables in the Unix environment with the demo.