DronaBlog

Tuesday, July 17, 2018

How to Clear the Java Web Start (javaws) cache on a local client machine

Are you looking for an article on how to clear the Java Web Start cache? This articles provides various ways by which you can clear the Java Web Start Cache.

Why clear the Java Cache?
Most of the time, the Java update occurs automatically so the system updates to the higher Java version. For security reasons, it is recommended to always maintain the most current stable higher Java version. Sometimes the higher version of Java is installed to support other applications. The Java cache is created for better performance of your Java application. So the Java cache will be out of sync when the Java upgrade happens. Due to this, the application will behave inconsistently. To avoid such inconsistent behavior of an application, we need to clear the Java Cache.

How to clear the cache?
There are three ways by which we can clear Java cache :
1. Using Java Configure Mode
2. Using command line
3. Manually deleting file

  1. Using Java Configure Mode -

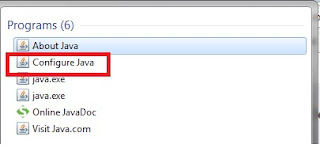
  • In this mode, if you are using windows system then go to Start -> Search function. Then type, Java. Several options will  popup. Select the Configure Java option from it.
  • Once you select, the Configure Java option and click on it, it will take us to the dialog box 'Java Control Panel'. In this dialog click on the 'Settings' tab.

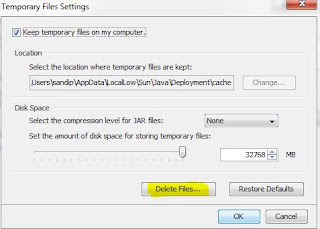
  • Once we click on 'the Settings' button, it will take us to another dialog box - 'Temporary Files Settings'. In this dialog box, click on Delete Files to delete the Java cache. 


2. Using Command Line Mode -

  • Open your computer's DOS prompt by selecting the Start menu followed by the Run option. 
  • Enter 'command' followed by pressing the Enter key.
  • Type javaws at the DOS prompt followed by the Enter key to see the Java Web Start command-line options.
  • Type javaws -Xclearcache followed by the Enter key to clear Java Web Start Cache on your computer. 
  • After the cache has been cleared, the local drive prompt will appear on the DOS prompt.

3. Manually Deleting Files -

  • Delete the cache folder located in C:\Users\<user>\AppData\LocalLow\Sun\Java\Deployment on Windows 7.
  • For other Operating System versions, you might have to do the delete operation in the appropriate Sun Java folder.
How to fix 'Could not initialize class ssa.ssaname3.jssan3cl' Error message


Are you searching for an article about how to fix the issue caused by class initialization? What is the reason for getting this error? This article provides detailed information on the root cause of the error and how to resolve it.

What is the root cause of the SSANAME3 initialization?
Informatica MDM has a process called Tokenization. During this process several repository or jar files are utilized. The files used in this process are libjssan3cl.so, libssaiok.so, libssalsn.so, libssan3tb.so, libssan3v2.so etc. If these files are not available to use then tokens will not be generated during the tokenization process. Tokens are important keys for the matching process. So, during the start of the tokenization process, first check whether these files are available at the required location or not. These files can be put at any location and loaded in classpath. However, these files are generally placed in the cleasne/lib location. This cleanse/lib path must be loaded in classpath. If we do not put these files in classpath then during the initialization process the error message below will appear.

[ERROR] com.siperian.mrm.match.tokenize.TokenizeWorker: caught OTHER Error
java.lang.NoClassDefFoundError: Could not initialize class ssa.ssaname3.jssan3cl
at ssa.ssaname3.N3Dll.<init>(N3Dll.java:53)
at com.siperian.mrm.match.SsaBase.loadAndOpenNM3(SsaBase.java:183)
at com.siperian.mrm.match.SsaBase.<init>(SsaBase.java:56)
at com.siperian.mrm.match.tokenize.TokenizeWorker.realRun(TokenizeWorker.java:151)
at com.siperian.mrm.util.threads.MatchThread.run(MatchThread.java:78)

How to fix this SSANAME3 initialization error?
In order to fix this error perform the tasks below.
        Set these variables in the setDomainEnv.sh or setDomainEnv.bat file present under the $WL_HOME/bin directory and restart the AppServer. For other application servers, be sure to set these variables in their corresponding startup scripts.

  • ·         For Linux, add Hub/Cleanse/Lib to the LD_LIBRARY_PATH and create an SSAPR Environment Variable.

LD_LIBRARY_PATH = <Hub_Cleanse_Install_Directory>/lib
SSAPR = <Hub_Cleanse_Installation_Directory>/resources
  • For Windows, add Hub/Cleanse/Lib to the PATH variable and create an SSAPR Environment Variable.
PATH = <Hub_Cleanse_Install_Directory>/lib
SSAPR = <Hub_Cleanse_Installation_Directory>/resources

The video below explains the SSA Name 3 process in detail.


Tuesday, July 10, 2018

Performing MDM Code migration


Are you looking for information about how to perform MDM code migration? If so, then read this article which provides brief information about code migration for the MDM hub, User Exits, Informatica Data Director, etc.

Click here for the code migration document.

1. MDM Initial Migration
  • The development team needs to complete all the development activities and to validate the ORS to ensure that there are no errors.
  • Below are the steps to export an ORS (with all the development objects) from the source ORS (Dev/QA).
a)      In the source environment, launch the MDM HUB and connect to the Master Database.
b)      Click on the ‘Repository Manager’ under the Configuration Workbench.
c)       Click on the ‘export’ tab and select the repository to export from the dropdown list and click on the export button (Save the icon at the extreme right).
d)      Save the ORS as the MDM<EnvName><Date>.Change.xml file to the disk.
  • Below are the steps to Import an ORS to target ORS (QA/Prod) for the initial migration.

a)      In the target environment, launch the MDM HUB and connect to the Master Database.
b)      Click on the ‘Repository Manager’ under the Configuration Workbench.
c)       Click on the ‘Import’ tab and then click the button beside the Source to select the source repository to be migrated and then click on the ‘File Repository’ tab.
d)      Choose the Target repository (which is blank for the initial migration) to which the code needs to be migrated and then click on the ‘Apply Changes’ icon.
e)      MDM prompts the roll back option in case of any issues encountered during the code migration. Select ‘Full rollback’ so that there won’t be any partial code migrated to the Target ORS.
f)      Once the changes are applied, there will be a prompt for an integrity check. Select ‘Yes’ for the prompt.
g)      It will take a while to implement the changes and gives the below prompt. Select ‘Ok’ for prompt.

2. MDM Incremental Migration
  • The development team must complete all the development activities for the selected objects, validate the ORS, and make sure there are no errors.
  • Refer to the above steps for exporting (backup) the source ORS and the target ORS to the Change.xml file.
  • Below are the steps to import an ORS to the target ORS (QA/Prod) for the incremental migration:
a)      In the target environment, launch the MDM HUB and connect to the Master Database.
b)      Click on the ‘Repository Manager’ under the Configuration Workbench.
c)     Click on the ‘Promote’ tab and then click on the ‘Visual’ tab. Next click the button beside ‘Source’ and click on the ‘File Repository’ tab to select the source Change.xml file generated in the step above. 
d)      It will load the change list and validation will be done automatically. It should show the status as ‘Valid’.
e)      Select the Target ORS from the dropdown into which the changes need to be migrated. It will be shown below the progress bar and will take a few minutes to load the ORS objects. Once loaded, the objects with changes from the source to the target are shown as ‘Refresh’ icons and the new objects are shown with a green dot.
f)   Select the changes to be promoted, right click and select Promote. The popup shows up below. Select the option ‘Use Source values as the final results for conflicts’ and click ‘OK’.
g)      Once the changes are listed, click on ‘Run a simulation of changes’ icon  (white play button). This will simulate the changes and throw out any errors/issues. This way the issues can be identified before actually applying the changes.
h)      Below the prompt will be shown. Select ‘Yes’.
i)      Once the simulation is done, click on the ‘Apply Changes’ icon  (Green Play button).
j)      MDM prompts for the roll back option in case of any issues encountered during the code migration. Select ‘Full rollback’ so that there won’t be any partial code migrated to the Target ORS.
i)      Repeat the above steps (from step f) to promote the changes for each component (like Cleanse function, mappings, BOs, etc.)


3. MDM User Exits Migration
                  The customizations required in the MDM HUB are implemented in the MDM user exit java code. Any changes in the jar file in Dev need to be migrated to QA and further environments.  Below are the steps to migrate the user exit in the MDM HUB.
  • Connect to the MDM HUB in the target environment. Click on the ‘User Object Registry’ under the ‘Utilities’ Workbench.
  • Click on ‘User Exists’. Only one jar file can be uploaded as the MDM user exit.

a)      If the jar is being added for the first time, click on the plus (+) icon and add the jar file. 
b)    If the existing jar file needs to be updated, click on pencil ico , and the popup appears below. Browse the location of the jar file and click on ‘OK’. It will refresh in a few seconds and the latest jar file should upload to the MDM HUB.
4. IDD Code Migration
Follow the steps below to create a new IDD application for doing the initial code migration:
1)      Take the export from the source IDD application as shown in the screenshot below and save the zip file to the disk.
2)      Launch the target system’s IDD url and login with a user with required privileges.
3)      Click on the ‘Add’ button at the top and fill in the required details as below.
4)      Once the application is created, select the application and hover over the import button to see the dropdown of the options. Select the ‘Import complete IDD application (Zip)’ and browse the zip file from the source. 
5)      Bind the ORS and hover over the ‘Application State’ button and select the ‘Full Deployment’ option. It will take a few minutes to deploy the application. Once done, the application status should be valid (green check mark under the status column). 

5. Code Migration Issues
1)      Package Migration Issues:
a)      Custom queries have to be migrated manually by copying the query from the Source to the Target. However, new custom queries can be migrated from the Repository Manager.
b)      If any columns are removed from the non-custom query, those columns have to be removed manually from the Target system by directly going to the query under the package.

2)      BO Migration:
a)      The column in the target system needs to be deleted if any of the following occurs: any columns are removed from the BO, the data type is changed, the length is decreased, or the display name is changed. Follow the steps below in the Target system before deleting the column.
·         Check the impact analysis and identify the dependent objects such as Packages and Child Tables.
·         Remove the field from all the Packages where the particular field is referred.
·         Remove the column from the child table.
·         Once the field is removed from all the dependent objects, then remove the columns from BO.
·         Migrate the column from the Source to the Target system from the Repository Manager.


3)      SAM Migration:
Once the SAM access for an existing role is migrated from the source to the target system, check the SAM access by querying the database. Below is a sample query:

select 'QA' ENV,sysdate CREATE_DATE, B.ROLE_NAME,C.SIPERIAN_OBJECT_UID,A.PRIVILEGE_CREATE_IND CREATE1,
A.PRIVILEGE_READ_IND READ1, A.PRIVILEGE_UPDATE_IND UPDATE1,
A.PRIVILEGE_DELETE_IND DELETE1,A.PRIVILEGE_EXECUTE_IND EXECUTE1
from cmx_ors_dev2.C_REPOS_SAM_ROLE_PRIVS A,cmx_ors_dev2.c_repos_sam_role B,
cmx_ors_dev2.C_REPOS_SAM_RESOURCE C
where A.rowid_sam_role=B.rowid_sam_role
AND A.rowid_sam_resource=C.rowid_sam_resource

4)      Hierarchy Migration:
If a new hierarchy is created on the existing BO, then the BO needs to be truncated to migrate from the source to the target.


5)      Securing the Resources:
If any new code objects are migrated to the Target system, make sure to verify that these objects are secure from the SAM tool in the MDM HUB by applying the filter below.
The screenshot below shows the secure resources and the checking for any Private resources.

Monday, July 9, 2018

Tokenization process in Master Data Management

           
This article provides detailed information on the tokenization process in Master Data Management (MDM). What happens internally during the tokenization process? What are the performance challenges and how to fix these during the tokenization process? All these questions will be answered in this article.

What is tokenization?
         For example, people visit the Dept. of Motor Vehicles (DMV) office for various purposes: drivers license application, vehicle registration, or identity card acquisition, etc. How are these different kinds of requests handled at the DMV? In order to address different types of requests, first similar requests are grouped together by providing particular types of tokens. Similar kinds of tokens will be addressed in one queue.
         In a similar manner the MDM tokenization process works. Different kinds of of tokens are assigned to different kinds of data. Similar kinds of tokens are grouped together and matched with each other during the matching process.
         In the MDM tokenization process, similar records as well as exact records are grouped together. In order to achieve tokenization, we need to create fuzzy match rules. Exact match rules will not generate tokens as exactly matched records.

What are match tokens?
These are encoded and non-encoded representations of the data in base object records. The tokenization process generates one or more tokens for each record.

Match tokens include following things:

  1. Match keys are fixed-length, compressed strings consisting of encoded values built from all of the columns in the Fuzzy Match Key of a fuzzy-match base object. Match keys contain a combination of the words and numbers in a name or address such that relevant variations have the same match key value.
  2. Non-encoded strings consist of flattened data from the match columns (Fuzzy Match Key as well as all fuzzy-match columns and exact-match columns).
How are tokens generated?
      Token generation is a very complex process. The generation of tokens is based on several factors: the match columns configurations, fuzzy criteria, and the length or width of tokens. For more details you can watch this video.


In which table are tokens stored?
       Various temporary tables are created during the token generation process. Temporary tables are dropped at the end of the process. Generated tokens are stored in the C_<BO Table >_STRP table.  It contains the columns below.
  1. SSA_KEY : Match key for the record. It is the encoded representation of the value in the fuzzy match key column, such as the name, address, or organization name, for the associated base object record. The string consists of fixed-length, compressed, and encoded values built from a combination of the words and numbers in a name or address.
  2. SSA_DATA : Non-encoded, plain text, string representation of the concatenated match columns defined in the associated base object table. Concatenated match columns include the fuzzy match key as well as all fuzzy match columns and exact match columns.


Why does the tokenization process cause performance issues?
      Performance issues either in the tokenization process or other processes depend on the factors below:
  • Volume of records getting processed
  • Hardware configuration
  • MDM Hub configuration 
  • Application server configuration
  • Data and Hotspot issues
      Out of the above mentioned causes, the MDM configuration-related problems can be fixed by tuning the MDM hub and the other configurations in the properties files. Similarly, the application server- related configuration can be fixed.
     However, to address volume or data related issues, we need to take inputs from business users and data stewards. Any architectural or hardware level issues must be addressed in the designing phase.

Wednesday, July 4, 2018

How to write set method for classes generated by wsdl2java


If we generate classes using the wsdl2java tool then some of the classes do not generate the setter method since the get method will act as the setter method. Few of the calling applications need the setter method.


Below is an example of how to write the setter method for the classes generated by the wsdl2java tool.

e.g. Let's consider the example of the AddressList calls which contains the object of the Address class.

public class Address {
    protected String addressLine1;
    protected String addressLine2;
    protected String cityName;
    protected String stateName;
    protected String countryCode;
    protected String countryName;
    protected String zipcode;

    /**
     * Gets the value of the addressLine1 property.
     * 
     * @return
     *     possible object is
     *     {@link String }
     *     
     */
    public String getAddressLine1() {
        return addressLine1;
    }

    /**
     * Sets the value of the addressLine1 property.
     * 
     * @param value
     *     allowed object is
     *     {@link String }
     *     
     */
    public void setAddressLine1(String value) {
        this.addressLine1 = value;
    }

    /**
     * Gets the value of the addressLine2 property.
     * 
     * @return
     *     possible object is
     *     {@link String }
     *     
     */
    public String getAddressLine2() {
        return addressLine2;
    }

    /**
     * Sets the value of the addressLine2 property.
     * 
     * @param value
     *     allowed object is
     *     {@link String }
     *     
     */
    public void setAddressLine2(String value) {
        this.addressLine2 = value;
    }

    /**
     * Gets the value of the cityName property.
     * 
     * @return
     *     possible object is
     *     {@link String }
     *     
     */
    public String getCityName() {
        return cityName;
    }

    /**
     * Sets the value of the cityName property.
     * 
     * @param value
     *     allowed object is
     *     {@link String }
     *     
     */
    public void setCityName(String value) {
        this.cityName = value;
    }

    /**
     * Gets the value of the stateName property.
     * 
     * @return
     *     possible object is
     *     {@link String }
     *     
     */
    public String getStateName() {
        return stateName;
    }

    /**
     * Sets the value of the stateName property.
     * 
     * @param value
     *     allowed object is
     *     {@link String }
     *     
     */
    public void setStateName(String value) {
        this.stateName = value;
    }

    /**
     * Gets the value of the countryCode property.
     * 
     * @return
     *     possible object is
     *     {@link String }
     *     
     */
    public String getCountryCode() {
        return countryCode;
    }

    /**
     * Sets the value of the countryCode property.
     * 
     * @param value
     *     allowed object is
     *     {@link String }
     *     
     */
    public void setCountryCode(String value) {
        this.countryCode = value;
    }

    /**
     * Gets the value of the countryName property.
     * 
     * @return
     *     possible object is
     *     {@link String }
     *     
     */
    public String getCountryName() {
        return countryName;
    }

    /**
     * Sets the value of the countryName property.
     * 
     * @param value
     *     allowed object is
     *     {@link String }
     *     
     */
    public void setCountryName(String value) {
        this.countryName = value;
    }

    /**
     * Gets the value of the zipcode property.
     * 
     * @return
     *     possible object is
     *     {@link String }
     *     
     */
    public String getZipcode() {
        return zipcode;
    }

    /**
     * Sets the value of the zipcode property.
     * 
     * @param value
     *     allowed object is
     *     {@link String }
     *     
     */
    public void setZipcode(String value) {
        this.zipcode = value;
    }
  }

Below is example for writing setter method -


public class AddressList {
    protected List<Address> address;

    /**
     * Gets the value of the address property.
     * 
     * <p>
     * This accessor method returns a reference to the live list,
     * not a snapshot. Therefore any modification you make to the
     * returned list will be present inside the JAXB object.
     * This is why there is not a <CODE>set</CODE> method for the address property.
     * 
     * <p>
     * For example, to add a new item, do as follows:
     * <pre>
     *    getAddress().add(newItem);
     * </pre>
     * 
     * 
     * <p>
     * Objects of the following type(s) are allowed in the list
     * {@link Address }
     * 
     * 
     */
    public List<Address> getAddress() {
        if (address == null) {
            address = new ArrayList<Address>();
        }
        return this.address;
    }
    
    public void setAddress(Address oaddress) {
     if (null != address)
     address.add(oaddress);
     else {
     List<Address> listAddress = new ArrayList<Address>();
     listAddress.add(oaddress);
     this.address = listAddress;
     }
    }


How to Handle Informatica MDM errors?

This article helps you to understand the different errors which occur during the various executions of the MDM process. This article also gives the solutions for such errors and issues.

Error 1 : SIP-28070
Scenario :  While executing Match Job through Job Viewer you get the following error:

Executing ... failed.

Cannot execute procedure at this time.
Refresh the status of this procedure.
Check the application server log for more information.
See Informatica MDM Hub documentation for more information.

Solution : 
Check the application logs. If the error below is noticed then it means that you have not configured the cleanse server.

17:02:04,993 INFO  [stdout] (AsyncAppender-Dispatcher-Thread-10 in BATCH mode.

17:02:04,993 INFO  [stdout] (AsyncAppender-Dispatcher-Thread-102)       MATCH;  BATCH;2) Caused by: com.siperian.common.SipException: SIP-28070: No Cleanse-Match server availab
le for MATCH

In order to resolve this issue, go to the Utilities section of MDM Hub and select the Cleanse Server (in MDM 9.5 version) or the Process Server (in MDM 9.7) and configure the cleanse server.

Exploring Amazon SES: A Powerful Solution for Email Delivery

Email communication is a cornerstone of business operations, marketing campaigns, and customer engagement strategies. Reliable email deliver...